Um, Why?
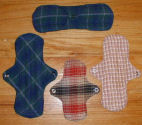
I was in the mood for a quick sewing project that I could do with fabric I had on hand. I wanted to re-use the fabric to make something truely useful. While searching for tote bag ideas, I came across Jan Andrea's pad pattern, and thought I'd give it a try. To my surprise, I find using these for light days really comfortable and convenient. Who knew?!
![]()
This pattern is licensed under a Creative Commons License and is Copyrighted 2006 by Pauline Harding.
Other Cloth Menstrual Pad Patterns
FREE PATTERNS:
• Jan Andrea's page first got me inspired to make these pads, and the method I use is based on what she describes, though I've tweaked it to make a few things easier. She has a free all-in-one style pad pattern (recently updated to tessellate!), and lots of other cool sewing projects on her site. Thanks Jan!

• This Australian site has a wealth of information - free patterns in several sizes and styles, why's and how's of using them, a wide variety of useful links, etc.
• Hillbilly Housewife has a free envelope-style pattern, and some thoughts on using cloth.
• Tinybirdsorganics has a nice tutorial for an envelope-style pad that can be used alone or with inserts. Lots of pictures!
• Diapersewing.com has a very detailed free pattern and tutorial for sewing envelope-style pads. This pattern requires a serger.
• Many Moons has a free envelope-style pattern with tutorial, and some thoughts on adding a waterproof layer. This pattern requires a serger. They also sell organic flannel and ready-made pads.
• Craftster has a huge discussion thread about sewing and using cloth pads. There's another one at DiaperSwappers.
MORE FREE PATTERNS:
• WikiHowTo has a free pattern for an envelope-style pad.
• Health, home, and happiness has a tutorial for a pad with wings cut separately.
PATTERNS TO BUY:
• New Conceptions sells the Personal Things pattern which includes a number of styles (envelope, all-in-one, and even nursing pads for breastfeeding moms).
• The PrettyPads pattern is for an all-in-one style in several sizes.
• Kristin's Cloth Pads sells the Kristin's Cloth Pads pattern, which makes an envelope-style pad in several sizes.
• Candle on the Hill sells the KinderBeeTM pattern for an all-in-one style pad in several sizes.
Ready-Made Cloth Pads

• Luna Pads sells a wide variety of cloth pads and other supplies for your period. These folks have been in business for over ten years!
• Etsy, a great place to buy and sell handmade items, usually has a variety of ready-made cloth pads for sale, some of which look better than others.
• EBay also usually has a variety of cloth pads for sale. Again, look carefully for quality.
Feedback
This page has been getting over 1000 hits a month, from all around the world, and folks have been sewing these pads! I'm so thrilled to see my pattern being used! Here are a few examples. If you make some pads using this pattern, send me a pic and your comments and I'll post 'em:
--Sarah over at Saving in Cincinnati has a great pic of the lovely lavendar pads she made.
Helping Others
Several organizations donate cloth pads to girls in need. Why not hold a sewing party with some friends to make some?

~~~
This Web Page by Pauline Harding for Art Nurk, askpauline@comcast.net
All content, including text, photos, and pattern, are copyright 2007.
Contents may be copied for personal use if credit is given.
![]()
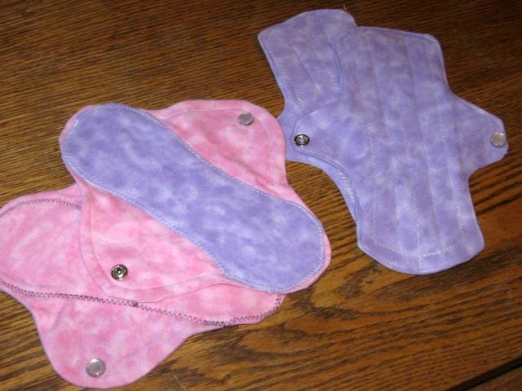
These washable cloth menstrual pads are quick and easy to make,
and very comfortable to use. Plus, they're cute! Use my free pattern!
SUPPLIES: 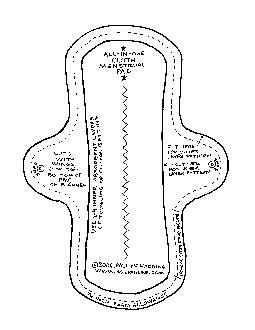
- Pauline's Pad Pattern - save it to your computer then print two copies. (This is a large file. If you have trouble with it, please email me and I'll try to solve the problem.)
- Flannel for the outer layers. Use an old flannel shirt or pj's, or buy 3/8 yard, which is enough for two pads.
- Toweling or batting for the inner layers. You can recycle a cotton hand or bath towel. Or you can buy 3/8 yards of 100% cotton batting, like Warm & Natural.
- Waterproof or water-resistant fabric, if desired. There are many waterproof fabrics on the market, from nylon with a polyurethane coating, (often called PUL) to high-tech fabrics like Ultrex and Wind Pro fleece. The Green Pepper sells a variety of such fabrics and, while they don't have their fabrics on-line, they have a very informative catalog. The Rain Shed also stocks many high-tech waterproof fabrics.
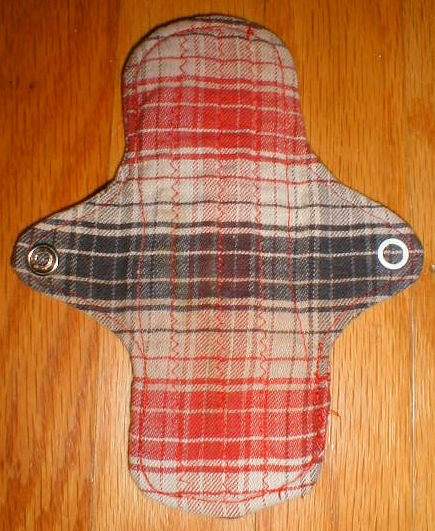
- A fastener. I use one four-part snap. You can buy a pack of these, with an attachment tool, at fabric stores. Or you could use a sew-on snap, hook-and-loop tape (VelcroTM), or a button and buttonhole.
- Sewing machine. One that can do a zig-zag is best, but a machine that only does straight stitch will do. (For that matter, you could do this by hand if you really wanted to.)
THE PATTERN:
- Open Pauline's Pad Pattern, and save it to your computer. There are two pattern pieces - the outer layer, which has the wings, and the inner absorbent layer. Print out two copies of the master pattern page, so you can cut the outer layer pattern from one and the inner layer pattern from the other.
- Use the outer layer pattern to cut 2 pieces of flannel, one for the top layer and one for the bottom.
- Cut 1-4 pieces of toweling or cotton batting for the inner layer. (I'd suggest using two layers for your first attempt, as it will be thick enough to be useful but thin enough to be easy to handle.)
- If you want a waterproof layer, cut it using the outer layer pattern.
 SEWING YOUR PADS:
- First, you will attach the inner layers to the top layer. This will help keep them from bunching or shifting during the rest of the process. Put down the top outer layer piece, right side down. On top of this, stack the inner layer pieces. The one you put down first will be the closest to the top of the finished pad. Do not use the bottom outer layer piece - this will be attached later.
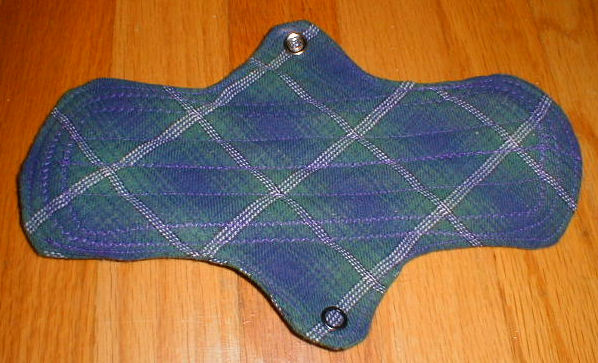
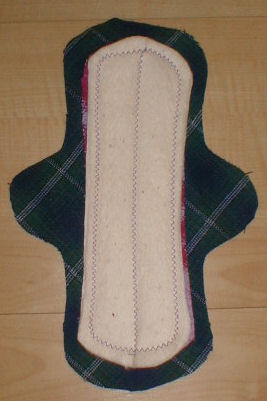
- Pin this stack at each end and at the middle. With the inner pad side up, sew a zig-zag line down the middle of the pad - see the picture below. (I use the "2" zig-zag width on my machine, which is about half the maximum setting.) This will anchor the layers together. It works best if, once you get started, you pull the stack taut (by holding the front and back) as you put it through the machine, to minimize creeping/shifting.
- Then sew a zig-zag line around the outside of the inner layers. It doesn't have to be right on the edge - in about 1/4" works well. This will help to keep the layers from bunching and help the wings fold properly. When you are finished it should look like the picture to the left. (In the picture you can see that I have used one layer of toweling (the pink/lavender you see peeking out), and two layers of "Warm & Natural" batting. The green plaid flannel is the outer layer.)
- Now you are ready to use the bottom outer layer piece. Turn the stack over so the top outer layer is on top of the stack. It should be right side up. Now put the bottom outer layer on top of it, right side down. (The right sides of the two outer layers will be together.) If you are using a waterproof layer, put it on top of the stack. Flip this whole stack over and pin together around the edges.
- With the inner pad side up, and using a straight stitch, sew around the pad using a 1/4" seam allowance, leaving a 2" opening for turning (ideally in one of the straighter parts). There will be a gap of approximately 1/4" between your seam line and the inner pad - after turning, this space will be taken up with the thickness of the inner padding and the seam allowances. If you don't leave this space, it is really hard to turn the pad and keep all of the inner layers smooth.
- Carefully turn your pad right side out.
- In preparation for topstitching, pin around the edges, especially on the wings and at the turning opening. Using a straight stitch, topstitch close to the edge of the pad all the way around. This will also close your turning opening, if you are careful.
- At this point, the top of the pad is quilted but the bottom is not. You can add some more quilting to create channels and attach the top of the pad to the bottom, or you can leave it as-is (which is probably best if you used a waterproof layer). If you decide to do some more quilting, you will want to keep the top side up -- the top of the pad already has some stitching from when you first anchored the inner layers, which will help you know where the edges of the inner pad are. You may want to zigzag some channels down the center of the pad. You may also want to zigzag around the edges of the inner pad.
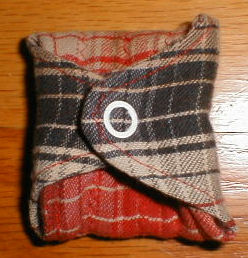
- Add the closure. I like metal four-part snaps, but you could use a button and button hole, or sew-on snaps, or hook-and-loop tape (VelcroTM). (But keep in mind that Velcro tends to stick to everything in the wash, and may wear out much sooner than snaps and much sooner than the rest of the pad.)
 NOTES:
- If your machine can't do a zig-zag, just use a straight stitch for the quilting.
- If you are using batting for the inner layers and it won't go happily through your sewing machine on its own, cut a piece of flannel using the inner layer pattern, and include it on top of your padding stack.
- If you are concerned that quilting will cause wicking along the quilt lines, you can stick with the first quilting part (where you stitch the inner layers to the top), and not do any further quilting.
- If you want to add a waterproof layer, cut it with wings and put it on the wrong side of the bottom outer layer. You might want to leave the bottom unquilted in this case, to avoid piercing the waterproof layer.
- If you do not use a waterproof layer, the pads will work best as panty liners for light or "just in case" days.
- For the bottom layer, you need a fabric that won't slip around. I've used flannel, but you might also want to try small-wale corduroy or fleece. Felted wool might also be a good choice. Water-resistant fleece, like Wind Pro, might also be worth trying.
- For the top layer, you want something soft and comfortable next to your skin. Flannel is a good choice.
- You may not need to buy fabric at all! You may have a flannel shirt in your give-away pile that will do nicely for the top, a pair of corduroy pants for the bottom, and an old towel for the inner layers. Just be sure the fabric is sturdy, as you'll want it to hold up after taking the time to sew it.
- If you buy new fabric, be sure to pre-wash it in hot water to pre-shrink it before sewing. I don't pre-shrink my batting, and it hasn't been a problem.
 ABOUT SNAPS:
- I get my snaps at my local Joann's. I've also bought them at Nancy's Notions in Intercourse, PA., where they have a huge selection and they are very inexpensive - about twelve sets for a dollar.
- Four-part snaps are a bit tricky to put on. If you screw up, it can be very difficult to remove the snap. Take your time. Read the directions.
- I prefer the little tool that you use with a hammer over the pliers. The hammer method applies force all around at the same time, while the plier method is more uneven. (Plus, of course, you've got to buy the pliers.)
- If you're using the hammer method, protect your table with a thick magazine, otherwise you'll get a little round dent in the table from the snap ring.
- If you follow the directions carefully, you should be OK, but do a practice set on a scrap of fabric first.
- Make sure you're putting the working side of the snap where it should be. Notice on each side of these pads there is one snap half facing up and one facing down. Check and double-check.
- Make sure you know which is the snap side and which is the "attaches to the metal ring" side. Check to see if you're right by snapping the two parts together.
- Make sure all prongs on the ring side are protruding through the fabric before attempting to attach the snap side. This is critical. I work the fabric over the prongs with my fingers. The instructions tell you to use a pencil with an eraser to push down the fabric between the prongs - this helps quite a bit.
- Before you turn your pad, you might want to trim the seam allowances a bit on the ends of the wings, so that you are applying the snap to two layers of fabric rather than four.
MAKING A PAD PATTERN:
- Want a different size pad? It's easy to make your own pattern.
- To make this pattern, I first traced around a disposable pad without wings. This became the inner layer pattern.
- For the outer layer, I traced the pad again then drew a line 1/2 inches wider all the way around. (1/4" of this will be your seam allowance, the other 1/4" is to allow room for the seam allowances inside the pad, and the thickness of the padding - this little space makes turning *much* easier. Since quilting will shrink the pad a bit widthwise, the finished pad will be about the same size as the disposable one you are copying.)
- Now to draw the wings. To figure out where they should start, fold the drawing in thirds lengthwise - the wings will be in the middle third. To figure out how wide they should be, fold the sides in as if you were using the wings, and draw a circle where the snap should go. The wing will need to be about 3/8" beyond the outside of the snap, plus you'll need 1/4" seam allowance. Draw the wing shape freehand, using gentle curves rather than sharp corners, as this will make sewing and turning easier.
WHY TRY CLOTH?
- It's a quick sewing project that recycles fabric.
- Sometimes a lady finds herself a little short on cash. Better to spend what you have on good bread and good books.
- Cloth pads are handy for those in rural areas, where going shopping can be a whole day's outing.
- They're pretty, and it's always nice to use pretty things.